PrintEx Documentation
Prepare UV printer artwork by placing an imported image inside a known blank template, then exporting a correctly sized raster file at print resolution.
Quick Start
- Open PrintEx.
- Click
Import Imageor drag an image into the window. - Choose the template that matches the blank you are printing.
- Move and resize the image inside the template preview.
- Choose the output resolution.
- Open
Settingsif you need registration marks, stained-glass layers, or a reverse image. - Click
Export. - The prepared image is now ready to drop into eufyMake Studio.
- To convert a eufyMake bump map to STL, import the image, click
Import Bump Map, then clickExport STL.
For store listing graphics, choose one of the Store Sample templates instead of a print blank template, then import or drop in a product photo.
Main Window
The toolbar contains the common workflow controls.
| Control | What it does |
|---|---|
Import Image | Opens a supported raster image. |
Import Bump Map | Opens a PNG bump map for the current imported image and template. |
Grid | Switches between inches and millimeters. |
Template | Selects the blank shape and size. |
Output | Selects the export DPI. |
| Settings button | Opens export options. |
| Fill rectangle button | Fits the image to the template. |
| Center-in-rectangle button | Centers the image in the template. |
| Rotate buttons | Turn the image 90 degrees left or right. |
| Store Sample object controls | Show the detected object size and shape, then fit or center the detected object. |
Export | Writes the final image file. |
Export STL | Writes the imported bump map as an STL mesh using the same physical width and height as the current export. |
| Camera button | Saves a PNG snapshot of the current PrintEx window. |
The window title includes the app version when version.json is available in the app bundle.
Supported Image Files
PrintEx can import common raster formats:
.png, .jpg, .jpeg, .bmp, .gif, .webp, .tif, .tiff
Bump maps must be PNG files.
Export Resolution
- Standard - 600 DPI for normal output.
- Enhanced - 1200 DPI when the printer, ink, and blank benefit from extra detail.
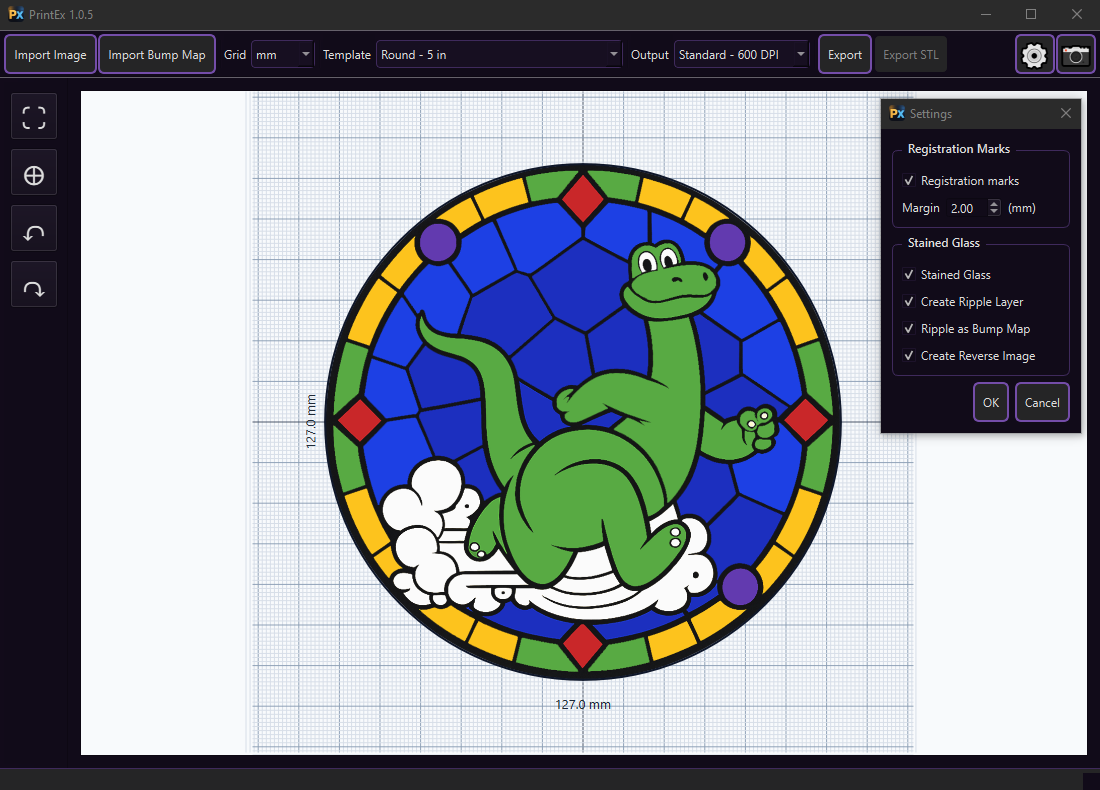
Settings
The Settings dialog contains optional export features.
| Setting | What it does |
|---|---|
Registration marks | Adds a 1-pixel black alignment outline outside the template border. |
Margin | Controls the registration mark distance from the template edge. The value is always in millimeters. |
Stained Glass | Exports an additional shadow layer named <export name>_shadow.png. The shadow layer represents the lead lines, came lines, black leading, leading strips, whatever you want to call them. |
Create Ripple Layer | Available when Stained Glass is enabled. Exports <export name>_ripple.png, the colored glass polygons without the came lines. |
Ripple as Bump Map | Available when Create Ripple Layer is enabled. Exports <export name>_map.png, a bump-map layer generated from the ripple layer. |
Create Reverse Image | Exports an additional horizontally flipped image named <export name>_reverse.png. This is useful for printing the other side of a stained glass image. |
The normal export is always written. Optional files are saved next to the normal export.
Registration Marks
When enabled, PrintEx adds outer registration marks outside the template border. These marks are intended for positioning and alignment and are outside the printable blank area.
The Margin setting controls how far the mark is from the template edge. It is shown and saved in millimeters, regardless of whether the main grid is set to inches or millimeters. Registration marks are drawn as a single black pixel so they are visible without using unnecessary ink.
When stained-glass, ripple, bump-map, or reverse layers are enabled, registration marks are included on those generated layers at the same location and width for easy consistent placement during layout.
Stained Glass
Stained Glass creates a shadow image for workflows that need a separate black layer for the lead lines, came lines, black leading, leading strips, whatever you want to call them. Near-black pixels from the final export become fully black pixels in the shadow image, and other pixels are transparent.
Create Ripple Layer creates a companion image containing the original non-transparent pixels that are not present in the shadow layer. This keeps the ripple layer and shadow layer from duplicating the same pixels. This will be printed first as white, to lay down lightness for the stained glass.
Ripple as Bump Map creates a grayscale height-map layer from the ripple layer. It uses a soft, irregular glass-ripple texture over the visible glass areas and emphasizes the edges of the ripple polygons so the bump map can give the printed surface more glass-like definition. This will be printed as Pattern Texture, Gloss Raised, 0.35 Thickness, Smoothness of 5.
Create Reverse Image creates a horizontally flipped copy of the final export for reverse-printing workflows. This is useful for printing the other side of a stained glass image.
If all stained-glass options are enabled, PrintEx writes the normal export plus shadow, ripple, bump-map, and reverse sidecar files.
Store Graphics
The Store Sample Square and Store Sample Landscape templates create product photos for PayHip or another online store. PayHip recommends a cover image width of at least 1000 pixels, so the square store template exports at 1000 x 1000 px in Standard mode and the landscape template exports at 1600 x 1000 px in Standard mode.
When a Store Sample template is selected, PrintEx detects the product in the imported photo and shows it with an orange rectangle. The left tool strip shows the detected object size at the selected output resolution and the detected shape name: circle, square, hexagon, or polygon.
- Select
Store Sample Square - 1000 x 1000 pxorStore Sample Landscape - 1600 x 1000 px. - Import or drop in the product photo.
- Wait for the loading indicator in the left tool strip to finish.
- Check the orange detection rectangle. Drag its handles if the detected product edge needs correction.
- Use object
Fitto resize the detected product to a consistent store-sample size. - Use object
Centerto center the detected product on the template. - Export the finished store graphic.
The regular image controls still work in Store Sample templates. Use the fill-rectangle button to fill the whole template with the image, the center-in-rectangle button to center the whole image, and the rotate buttons to turn the image 90 degrees.
Print Jigs
David's eufyMake print jigs on Printables include useful 3D printable jigs for positioning blanks on the eufyMake UV printer.
Templates
Each template is described by a JSON file and usually has a matching PNG thumbnail or mask. Dimensions can be defined in inches or millimeters.
Coin - 40 mm

| Shape | Ellipse |
|---|---|
| Size | 40.0 x 40.0 mm |
| Printable inset | 1.5 mm |
| Amazon blank | Blank Challenge Coin |
Use this template for small round 40 mm coin-style blanks. The printable inset keeps artwork away from the outer edge.
Hexagon Coaster

| Shape | Hexagon |
|---|---|
| Size | 111.0 x 98.0 mm |
| Printable inset | 7.0 mm |
| Amazon blank | Hexagonal Black Stone Coaster |
Use this template for hexagon coaster blanks. The inset leaves a substantial margin from the cut edge.
License Plate - 302 x 152 mm

| Shape | Rounded rectangle |
|---|---|
| Size | 302.0 x 152.0 mm |
| Corner radius | 7.0 mm |
| Slots | Four mounting slots |
| Amazon blank | Black License Plate Blank |
Use this template for standard license plate blanks with four mounting slots. Keep important artwork away from the slot areas.
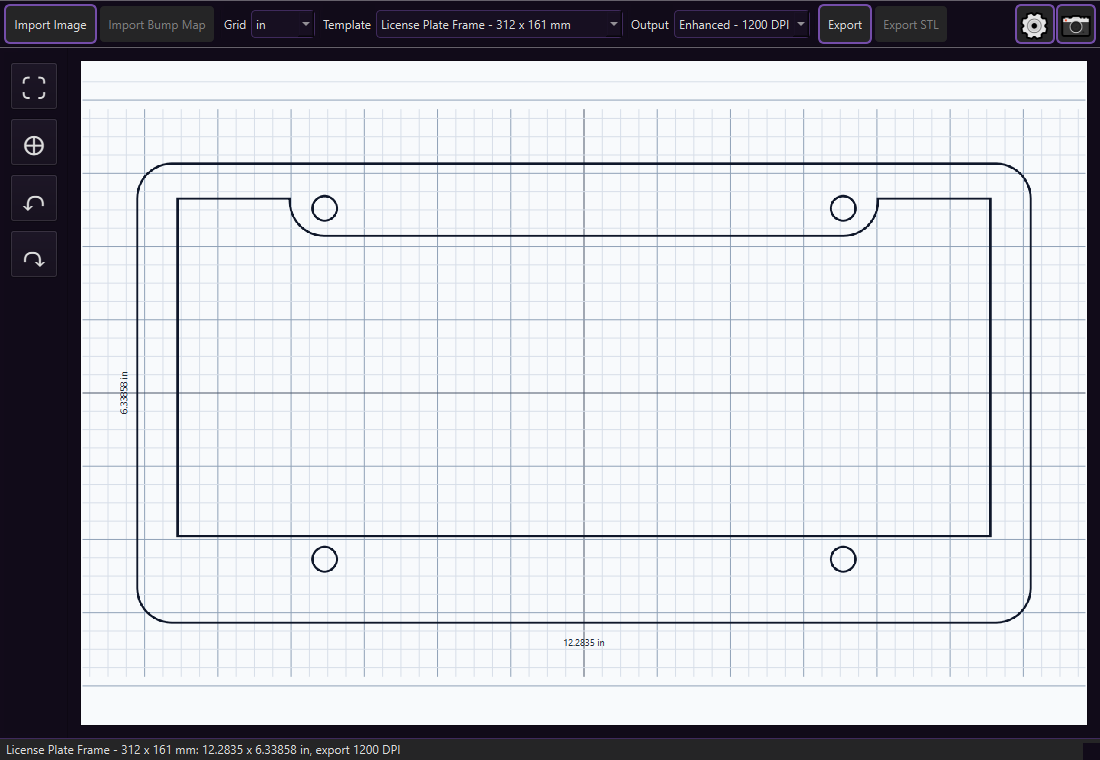
License Plate Frame - 312 x 161 mm
| Template file | templates/license_plate_frame.json |
|---|---|
| Image file | templates/license_plate_frame.png |
| SVG file | templates/license_plate_frame.svg |
| Shape | Rectangle with PNG mask |
| Size | 312.0 x 161.0 mm |
Use this template for license plate frame blanks. The PNG mask defines the frame outline, center opening, and mounting holes so imported artwork previews and exports only within the printable frame area.
Round Coaster - 4 in

| Template file | templates/round_coaster.json |
|---|---|
| Image file | templates/round_coaster.png |
| Shape | Ellipse |
| Size | 4.0 x 4.0 in |
| Amazon blank | Blank Round 4 in Ceramic Coaster |
Use this template for 4 inch round coaster blanks.
Round - 5 in

| Template file | templates/round_5in.json |
|---|---|
| Image file | templates/round_5in.png |
| Shape | Ellipse |
| Size | 5.0 x 5.0 in |
| Printable inset | 0.0 in |
Use this template for 5 inch round blanks with no built-in printable margin.
Square Coaster - 4 in

| Shape | Rectangle |
|---|---|
| Size | 4.0 x 4.0 in |
| Amazon blank | Blank Square 4 in Ceramic Coaster |
Use this template for 4 inch square coaster blanks.
Store Sample Square - 1000 x 1000 px

| Shape | Rectangle |
|---|---|
| Standard export size | 1000 x 1000 px |
| Enhanced export size | 2000 x 2000 px |
Use this template for square product sample graphics on PayHip or another store. Uses object detection to ensure consistent object placement across items in your store.
Store Sample Landscape - 1600 x 1000 px

| Shape | Rectangle |
|---|---|
| Standard export size | 1600 x 1000 px |
| Enhanced export size | 3200 x 2000 px |
Use this template for landscape product sample graphics on PayHip or another store. Uses object detection to ensure consistent object placement across items in your store.
Template JSON Reference
| Field | Purpose |
|---|---|
name | Display name in the template selector. |
width_in, height_in | Template dimensions in inches. |
width_mm, height_mm | Template dimensions in millimeters. |
shape | ellipse, hexagon, or rect. |
image | Optional PNG image or mask filename. |
corner_radius_in, corner_radius_mm | Rounded rectangle corner radius. |
printable_inset_in, printable_inset_mm | Inset from the outer template edge. |
holes | Circular cutouts or mounting holes. |
slots | Rectangular or rounded mounting slots. |
Slot by center point
{
  "x_mm": 67.0,
  "y_mm": 16.5,
  "width_mm": 30.0,
  "height_mm": 7.0
}
Slot by top-left edge offsets
{
  "left_mm": 52.0,
  "top_mm": 13.0,
  "width_mm": 30.0,
  "height_mm": 7.0
}
Stained Glass Workflow
This section outlines some of the steps for preparing for stained glass.
To turn any photograph into stained glass, watch this video from Kim and Garrett Make It!. It is not for the eufyMake, but all the information is really good. To get the AI prompt that they use, download the faux stained-glass master collection from the video.
In PrintEx
- Import your already prepared stained-glass image.
- Open
Settings. - Turn on
Registration marksif you want them. - Turn on the stained-glass features that you need.
- Save by clicking
OK. - Click
Export.
Files Created by Export
- PrintEx always creates the main export file you selected in the Export dialog.
- When
Stained Glassis enabled, PrintEx also creates<export name>_shadow.pngfor the lead-line layer. - When
Create Ripple Layeris enabled, PrintEx also creates<export name>_ripple.pngfor the colored glass layer. - When
Ripple as Bump Mapis enabled, PrintEx also creates<export name>_map.pngfor the bump-map layer. - When
Create Reverse Imageis enabled, PrintEx also creates<export name>_reverse.pngfor the flipped reverse-side image. - All files are saved in the same folder as the main export.
In eufyMake Studio
Load the layers using exact positioning and sizing.
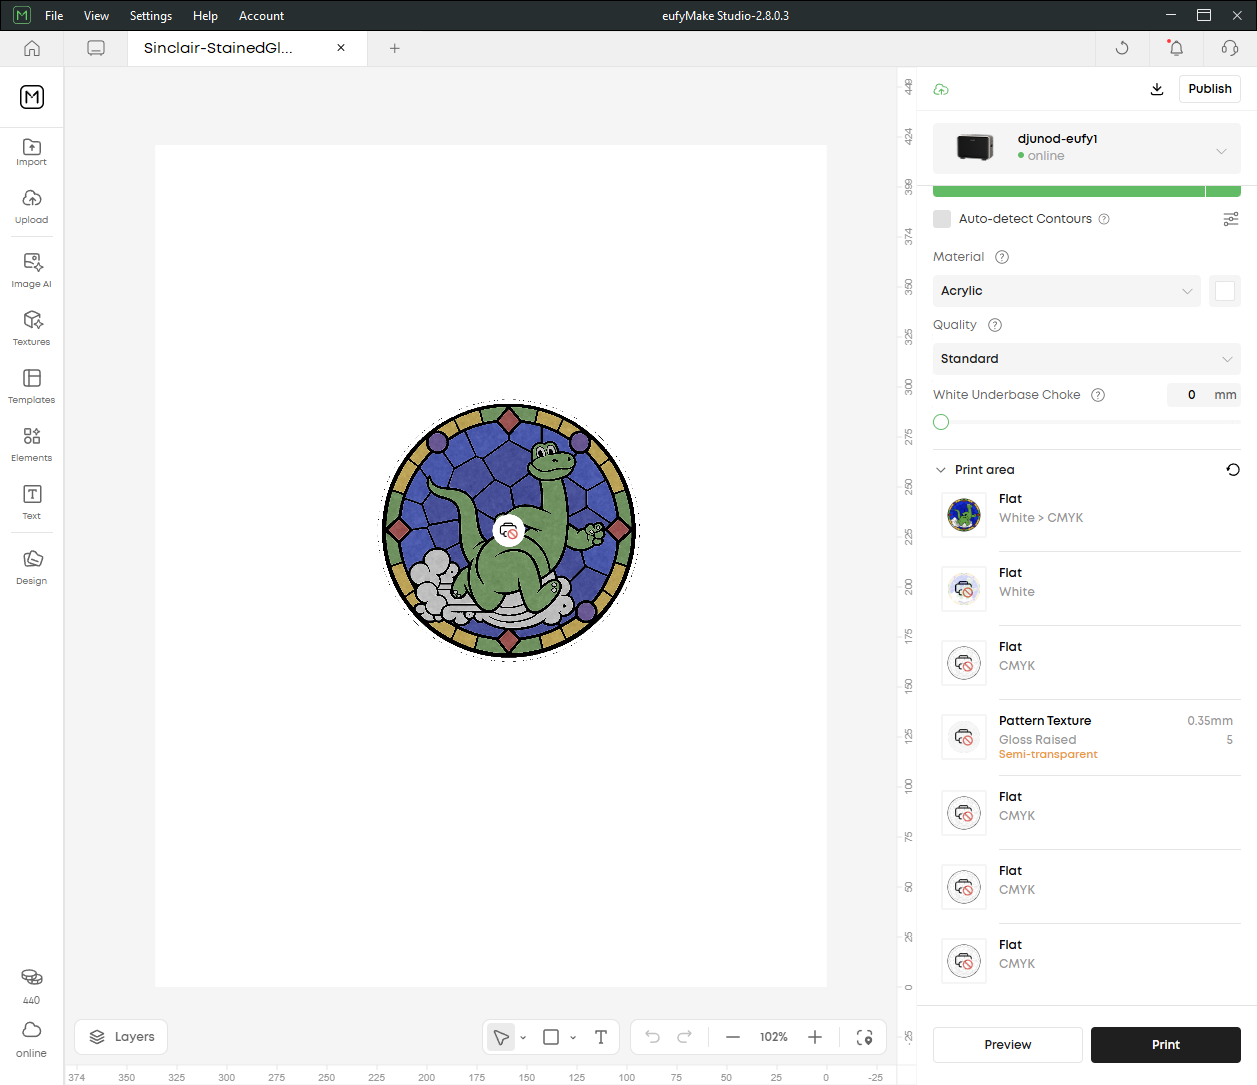
This video from Revved Up TV shows how to prepare the different layers using Adobe Photoshop and then how to layer and print them using eufyMake Studio. PrintEx prepares all these layers for you so that you don't have to use any other apps.
License Plate Frame
This example shows how to use PrintEx with a 3D-printed blank that you designed yourself. The blank is a license plate frame modeled in Tinkercad, printed as plastic, then decorated with a UV-printed graphic using eufyMake.
The same workflow works for other custom blanks: design the physical object, export an SVG outline from the design tool, import that outline into PrintEx as a template, then place your artwork inside the printable area.
Design the Blank
We designed the License Plate Frame in Tinkercad. The model includes the outer frame, the center opening, and the mounting holes.
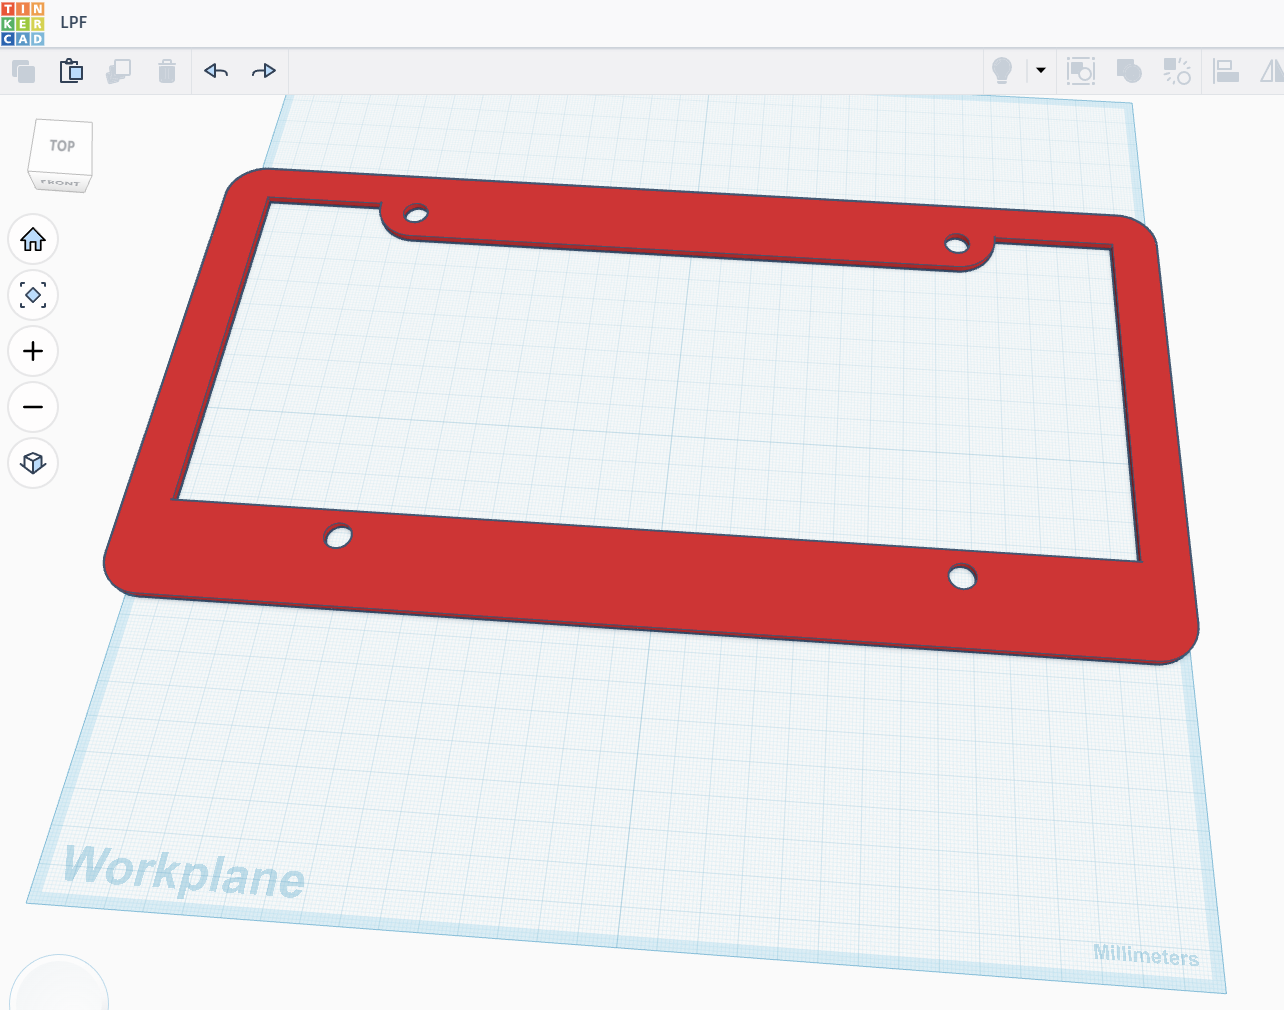
Export the .STL from Tinkercad and print the blank. Then export the .SVG outline. The SVG outline is what PrintEx uses to build a matching template for the graphic.
Create the PrintEx Template
In PrintEx, open Settings, choose the Template tab, then choose Import SVG. Select the SVG exported from Tinkercad.
PrintEx reads the SVG dimensions, creates a template JSON entry, saves a PNG mask, and keeps a copy of the SVG for the preview outline. The PNG mask controls clipping during preview and export, so artwork is constrained to the license plate frame shape instead of filling the rectangular bounding box.
Review the generated template JSON before clicking OK. For this frame, the template size is 312 x 161 mm, and the mask defines the outer frame, center opening, and four mounting holes.
Add the Artwork
Select the License Plate Frame template from the main toolbar, then import your graphic. Use the normal image controls to fit, center, rotate, or reposition the artwork until it lines up with the frame.
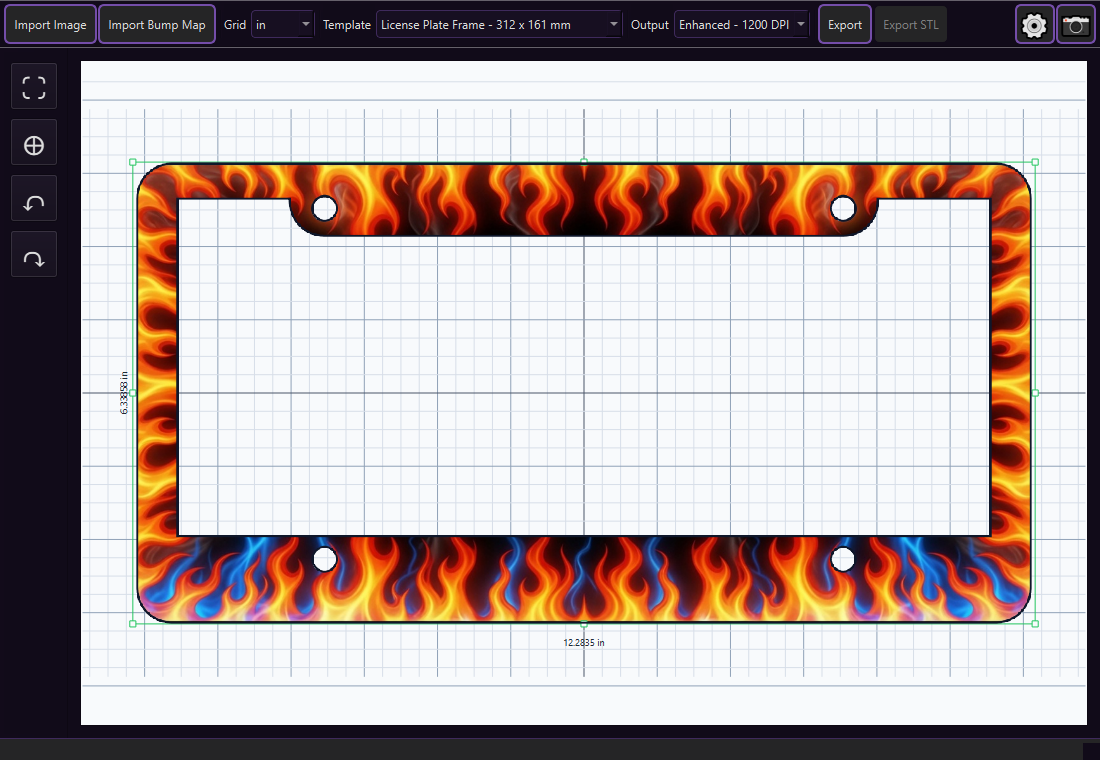
When you export, PrintEx writes a PNG at the selected output resolution with transparent pixels outside the frame mask. Load that exported image into eufyMake Studio and print it onto the 3D-printed blank.
Useful Links
This section contains some useful third-party information.
Stained Glass
This video from Kim and Garrett Make It! is not for the eufyMake, but all the information is really good.
A useful download from the above video, includes the AI prompt for converting a photograph to a stained glass image.
This video from Revved Up TV shows how to prepare the different layers using Adobe Photoshop and then how to layer and print them using eufyMake Studio. PrintEx prepares all these layers for you so that you don't have to use any other apps.
Troubleshooting
The image is the wrong size
Confirm the selected template matches the physical blank. Export size is based on the template dimensions and selected DPI.
The template thumbnail or mask is missing
Confirm the template JSON image field points to an existing PNG in templates/.